
GB
Add fibreglass research page from mouldmakers book when I vac form and fibreglass xiola face.
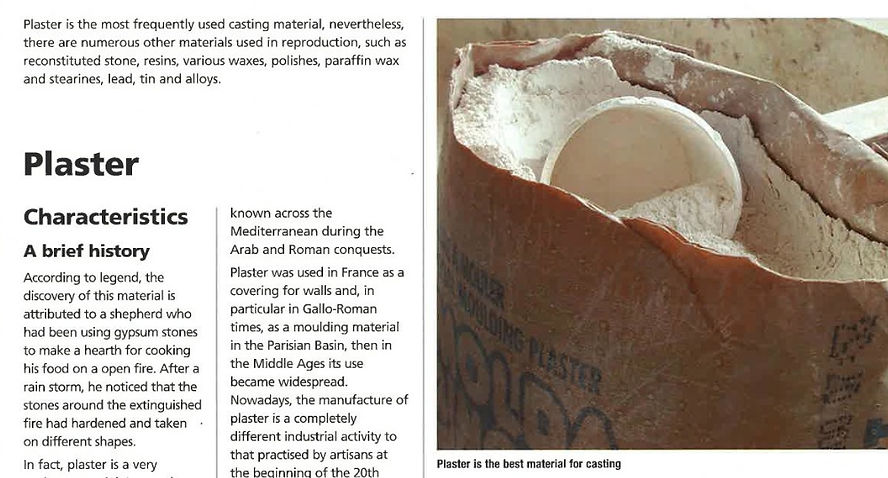
MOULDING & CASTING


Modelling: is the art of manipulating a malleable material, such as clay or Plasticine, into a particular shape or original piece known here as the model, positive or simply the origin.
Moulding: Is the making of a negative form by taking the impression of an object, this subsequently serves as a mould. Into this mould a particular material is poured and this reproduction, in either one or several examples, is known as the cast of the original model.
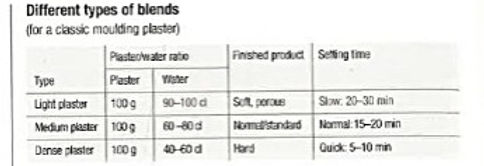
Below images and text: Delpech, J-P. and Figueres, M-A. (2004). The Mouldmakers Handbook. A&C Black Publishers. Soho Square: London.
FACE CAST

PRO TIPS: It is the mouldmakers psychological errors which are responsible for any stress the model might feel.
Protect the models hair with plastic film, or shower cap, and put cotton wool in the ears. Prepare 300g alginate to 300g water and apply it quickly starting at the top of the head working down over the face. Whilst the alginate is still runny, work it until it starts to congeal. Allow to cure for approximately 5 minutes.
Prop the support mould on some cloth or on a bag filled with sand. Block the nostrils with a small piece of Plasticine re-modelling the hollows.


If the model has any shallow bumps or hollows as in the case of low relief/bas-relief, the mould can be withdrawn without any obstructions making for easy removal.
Waste mould: A waste mould can only be used once. The majority of them are made from alginate or plaster originating from ‘soft’ models such as clay, Plasticine or wax. Alternatively, they can be used for moulding moels with deep undercuts or for life casting.
Another casting material is poured into the waste mould to duplicate the model whereupon it is called the original model. This can be modified to make a model for a new mould but this time it will be made from latex, silicone or even a multi-piece plaster one.
One advantage of the waste mould method is that any imperfections or seam lines on the replica can be removed by sanding prior to any subsequent moulding.
Xiola Face Measurements:
Hairline to chin: 22cm
Top of ear across: 22cm
Bottom of ear across: 25cm
Eyebrow to mouth: 15cm
Cheekbone to cheekbone: 14cm
 |
|---|
 |
 |
 |
 |
 |
 |
 |
 |
 |
 |
 |
 |

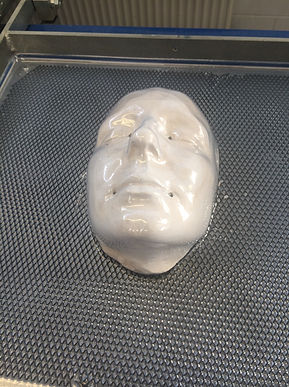
I started by applying Vaseline to the models hairline, brows and eyelashes- ensure the hair was fully covered, otherwise it would have stuck to the alginate. I then measured out two and a half cups of alginate and two cups of cold water, as the desired consistency was thick rather than runny. I Started at the forehead and worked my way down the face, paying extra attention to the eye sockets, massaging the alginate in and not missing areas. I had two people assisting the face cast, ensuring the nostrils where clear at all times and to apply the alginate quickly before it started to congeal on the face. From looking at the research above I knew to wrap cling film around the models hairline, this meant I could take the alginate further back, resulting in a fuller cast.
Once the face cast was dry and warm in temperature I started laying on the plaster bandage over the top of the alginate. The plaster bandage would act as a ‘jacket’, supporting the material inside. Again, I avoided covering the nostrils with the plaster bandage and kept checking the model wasn’t panicking underneath. Once the plaster had dried, I started to remove the cast- etching away at the edges with my fingers whilst communicating with the model.
 |
|---|
 |
 |
 |
 |
 |
 |
 |
 |
 |
Problems Faced:
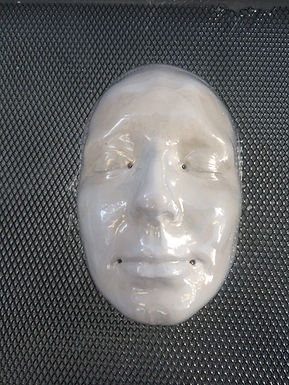
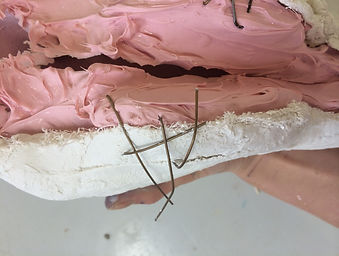
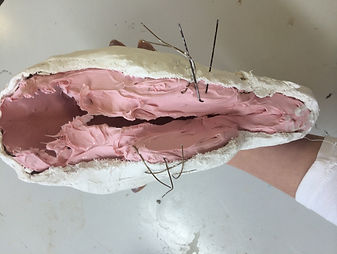
When I removed the plaster positive, from the cast there were faults and the nostrils were blocked up and protruding outwards. The lay didn’t work and crushed with the weight of the plaster. I used a small flat chisel and a hammer to chip away the faulted areas (around the eyes, mouth and nose. Once the face started to look like the model I used a drill with a 5.00mm drill bit to dig out the nostrils, afterwards I polished up any harsh edges with a piece of coarse sand paper.
I wanted to experiment and try new techniques (vac forming the plaster face and fibreglasing the inside) and had to create a drill bit by cutting a thin piece of copper wire on an angle and using it to carefully drill holes either side of the mouth and inner corners of the eyes on the plaster cast. This is necessary for vac forming, if there weren’t holes through the plaster then the air wouldn’t be able to escape and the plastic wouldn’t shape the face.

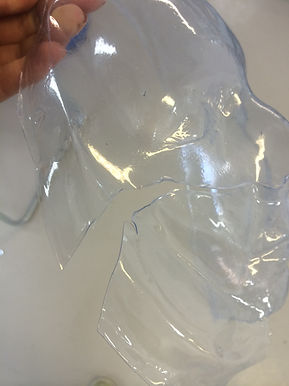
The models face was left for a day and where it had been handled there was undercuts, which had formed around the neck, the plaster had chipped away. This was problematic and the vac form was locked around the face. The plastic wasn’t salvageable and had to be cut off the face to avoid damaging the plaster.


FIXING THE FACE CAST
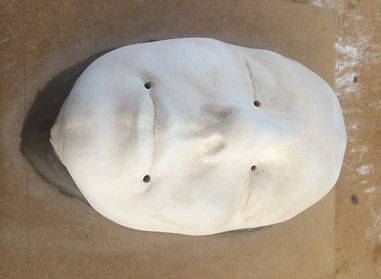
In order to fix the face cast I used water based clay to re-sculpt the whole neck and back of the head, I also went around the sides of the face to be sure of no undercuts as I was worried that I would have to destroy the plaster if the plastic locked on a second time around.
The video to the left shows a second problem after fixing the face cast. The plastic wasn’t taking to the shape of the plaster face and I tried altering the pressure numerous times, the result was the same and there were ridges in the plastic.


For alginate face cast: Advice from Pete:
Superglue the alginate inside around the edges of the nostrils. Then push very thick alginate through the cast and the nostril holes will look neater and more professional
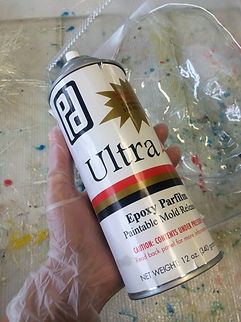


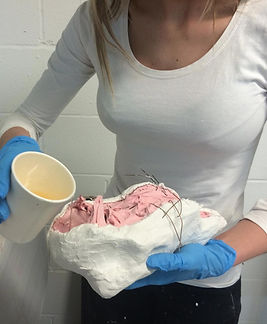
To back the vac form face with fiberglass I sprayed Epoxy Parfilm mold release over the inside of the cast and around the outer edges to ensure it would release with ease. After, I weighed out 118g of gel coat with 2% catalyst (because cup weighs 8g) so effectively I was weighing out 110g of gel coat to cover he surface area of the face.
FIBREGLASS PROCESS
 |
|---|
 |
 |
 |
 |
 |
 |
 |
 |
 |
 |
 |
 |
 |
 |
 |
 |
 |
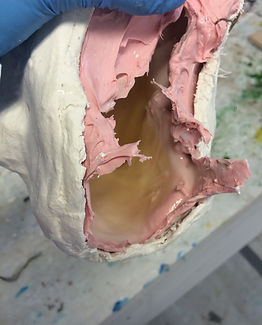
I wanted a fiberglass positive of my models face but I didn’t necessarily need the detail on the surface that you would get from fibreglassing into silicone because I was trying the process to measure out how large I would need to make small flat pieces of skin and finally as an exploration piece with pigments. I added all of the primary colors together to create a skin tone in the gel coat and again in the lay up resin and fiberglass mesh. However, I added too much white to the gel coat and the color became opaque, where as I was hoping for a translucent first layer. I added more red to the lay up resin, treating it like a blood layer; this didn’t show as much as I would have likes because of the opaque base layer. I now know that If I want to create a realistic skin finish in fiberglass I need to work in layers with the colors, adding small touches of pigment at a time.
RESULT

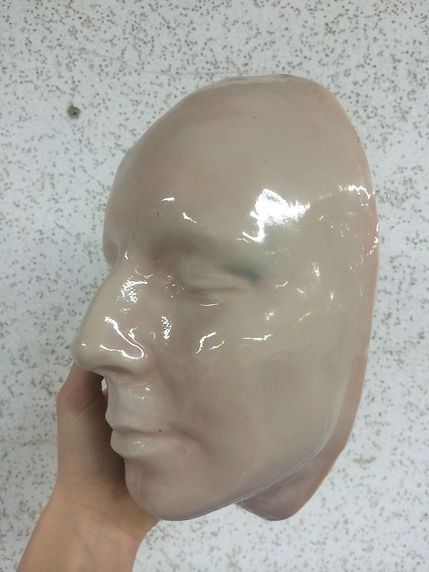
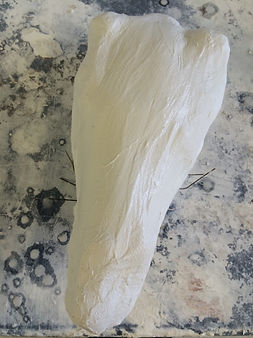
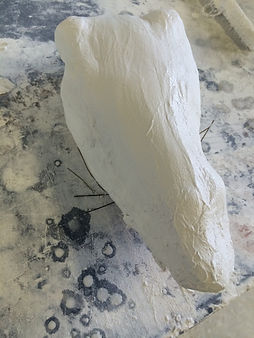
Once the fiberglass had fully dried I had to sand the areas where the vac form hadn’t picked up detail and created a ridge on the surface, i.e. the upper lip and either side of the neck. Once I had sanded and completely smoothed out the ridges I used the vibro saw to cut out the shape of the face, symmetrically either side, and again sanded down the rough outer edges. The result was better than expected but I would like to practice and perfect the coloring technique for this, as it would be beneficial to sculpt on a life like replica of a face with color for visual purposes.
MOULDING THE DEER SKULL
 |
|---|
 |
 |
 |
 |
 |
 |
 |
 |
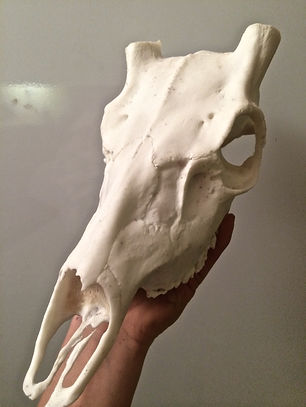
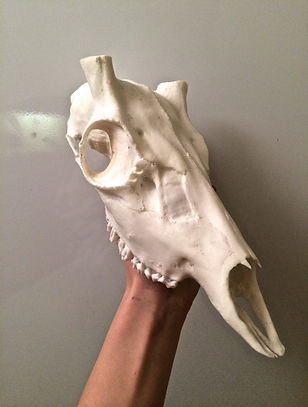
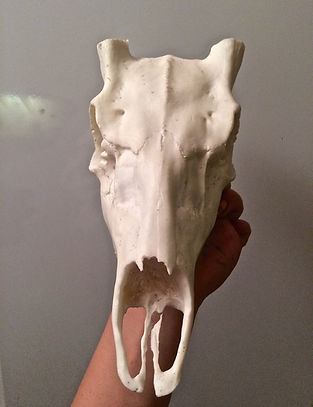
TAXIDERMI SKULL:
A deeper understanding of body structure, behaviour, and evolution needs, like any aspect of science, a framework for study. This framework is provided by ‘Taxonomy’, the grouping and classifying of living things. Every living animal has a scientific name that is recognized across the world and in all languages.
Above text: Parker, S., Taylor, K. and King, D. (2003) Mammal (Eyewitness). United Kingdom: Dorling Kindersley Publishers Ltd.
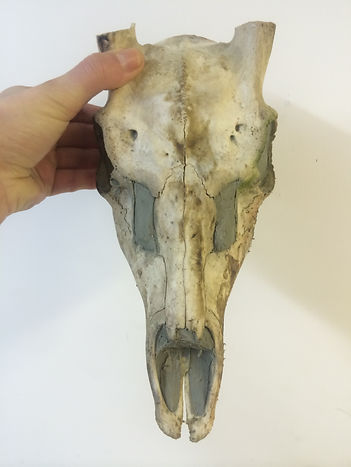
I purchased a Taxidermy deer skull from eBay for color and texture reference, even though Id seen and held the deer skeletons at the Grant Museum, I felt as though I needed the reference in front of me. Initially I was going to sculpt the skeleton but realized early on that there wasn’t enough time to complete the sculpt to the standard I would like to have and I thought about moulding it instead. Taking a mould of the skeleton would give me the same if not better effect and I could handle it/ paint it afterwards to manipulate its shape and design.

Choosing the right number of pieces, or parts, for the mould, as well as the correct alignment of the seam line is of the utmost importance and will determine the success, or not, of a piece mould. If the number of pieces has been badly judged, or the seam line is in the wrong position, the mould or even the model, will break when removed if made from plaster, or rip, if made from elastomer.
PRO TIP: Observe carefully everyday moulded objects and scrutinize the quality of seam lines and moulding: bottles, lead or resin soldiers, rubber or plastic handles, electrical plugs etc.
Study them and try to work out the seam lines and number of pieces necessary for their manufacture.
Above: Delpech, J-P. and Figueres, M-A. (2004). The Mouldmakers Handbook. A&C Black Publishers. Soho Square: London. (page 14).

Sock or one part skin mould, cas the deer skull in silicone and add a plaster jacket to support it. PROS: NO SEAM.


BLOCKING OUT HOLES
Wed clay was used to block out all of the holes on the skull, I had to block up wherever there was as crack or even tiny hole to prevent the silicone running inside of the brain cavities and ultimately being wasted material, lost within the skull. I wasn’t going to be moulding the back of the skull and left it free.
MOULDING:


I used a cheaper silicone from PS Composites to mould the skull, the mix is a ratio of 10 parts silicone base to 1 part catalyst and I used industrial scales to measure the two parts. I measured both parts A and B in separate cups and then poured them into the same plastic cup to mix the two solutions together. The catalyst was a bright red colour and sat on top of the silicone, the ratio is seen on the images above: 160g silicone 10% catalyst at 16g.


I made the mistake of not propping the deer skull up against anything whilst the first layer of silicone was drying, this meant that when the silicone had fully cured into rubber it was stuck to the board beneath and I had to tear it away from the teeth. The first layer on the teeth had to be re-done in order to pick up the fine detailing around the gums.
 |
|---|
 |
 |
 |
 |
 |
 |
 |
 |
 |
 |
I used a metal stand to prop the deer skull up on an angle for the second layer of silicone to prevent it curing onto a flat board again, the stand also made applying the thick rubber easier and the process was a lot quicker. For the second layer I added a very small amount of thixotropic into the mix to thicken it up, the consistency was a lot thicker and I was able to smooth it on like a filler.
I mixed up 160g of silicone to 16g catalyst, as I did for the first layer, but it wasn’t enough to cover the entire skull and there were still thin areas. I mixed up an extra 140g silicone with 14g catalyst and covered the front and back. Keeping a divide line down the centre of the back for easy release.
Above and Below: Delpech, J-P. and Figueres, M-A. (2004). The Mouldmakers Handbook. A&C Black Publishers. Soho Square: London. (page 104 and 105).
Caution: when buying plaster as for moulding plaster. The material used in the building trade is too grainy and therefore unsuitable.
Caution: Always add the plaster TO the water and never the opposite. Blend it progressively and never in one go. Always prepare more plaster than necessary as pouring in stages will make the cast very fragile.
Colouring the plaster:
This takes place in the water and not in the blending. To colour the plaster uniformly, add water-soluble powder pigments or any other acrylic paint. The most stable pigments are the clays, ochre and natural oxides such as: sienna, yellow and red ochre, black etc.
 |
|---|
 |
 |
 |
 |
 |
 |
 |
 |
 |
 |
 |
Plaster bandage was used to surround the silicone once it had cured; this acts as a jacket for the rubber, which cannot support itself. Plaster sticks to plaster and I had to cover one half of the skull first, allow drying time and apply mould release wax, before covering the other half. The plaster bandage was split over two sides of the mould, this enabled me to peel the rubber away from the silicone easily, if the plaster was as a whole then the structure would have hardened and I wouldnt be able to seporate the mould.


PROBLEMS WITH CAST:
Once I’d cast both sides of the skull I realised that I couldn’t pull the plaster apart because Id added plaster bandage underneath and around the teeth. There was too big of an undercut to release the skeleton and I had to use a scalpel to slice away the two undersides.
Once I had released the skull from the rubber and connected the plaster bandage around both sides another problem arose; the silicone wasn’t secured anymore around the teeth and therefore wouldn’t cast correctly, I tried to superglue the silicone to the sides of the plaster but it didn’t adhere. I found some thin wire and cut it to size, then pierced the sides of the silicone through to the plaster and bent it over. The below images are of the mould once I had released the skeleton, the plaster bandage had to be connected in the middle to fully secure the silicone ready for casting.


FAST CAST RESIN


I used fast cast resin to create a positive mould of the skull because it resembles bone most out of all materials and this way I was able to create a thin skin of resin and fill the mould with rigid foam and the skull would be light on the models face, but look heavy like bone.
The resin is equal parts A and B and I wasn’t sure how much to measure out, I measured 75g each of A and B to start and ended up mixing too much for the first coat, a lot of resin was wasted in the process.
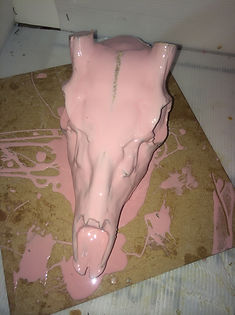
Below: For the second coat I used a lot less resin at 40g each A and B- 80g in total. The cup weighed 7g alone and this was taken into account when taking the measurements. I added tiny amounts of pigment to the second and third layer of resin because it was showing a lot whiter than expected. I wanted the positive to look like an off white/ cream colour and altered the pigment accordingly.

Above: Pouring the resin into the mould, the second image is the colour of the resin before adding pigment (the first layer) and the third picture is the resin with pigment, the colour was starting to resemble bone at this point.


Repro-Cell 300 Isocyanate Rigid Foam equal part A and B was used to fill the mould because it is a light weight material and I didn’t want the skull to be completely hollow, the resin wouldn’t hold and the piece would look too thin. Again the cup weighed 7g and I poured 57g of parts A and B, equalling 100g of rigid foam. I was expecting the foam to rise dramatically and unfortunately it didn’t, it barely rose at all. I had to mix up some more foam and repeat the process until the foam started to run outside of the mould.
CLEANING UP


The skeleton came out of the mould easily but there was rubber stuck between the teeth and around the gum area. The underside of the mouth was over cast where the split in the silicone was from moulding and overall the skeleton needed to be cleaned up. I used a scalpel to pick out some of the rubber from the teeth and then a dremmel tool to sand down the rigid edges. Below: Dremmel tool, respirator and goggles. The eyes, nose and mouth must be covered for health and safety reasons. The small shards of rigid foam and resin are dangerous both for the eses and to swallow.


Above: A time lapse of me using the dremmel to care and sculpt the skull. I also used the dremmel tool to begin carving the skull, I carved out all of te areas which had been filled in with clay during the moulding process. Afterwards I used a smaller dremmel part to sculpt and carve in any areas of the skull which I felt needed altering, I added in line detail ready for paining and carved out the nostrils, exposing some of the foam beneath the resin.
CARVING THE SKULL
RIGID FOAM
 |
|---|
 |
 |
 |
 |
 |
 |
 |
 |
 |
 |
 |
 |
FINISHED SCULPT
Above: Delpech, J-P. and Figueres, M-A. (2004). The Mouldmakers Handbook. A&C Black Publishers. Soho Square: London.