
GB
GRP (glass reinforced polyester) Polyester Polyurethane Resin
fast cast dental acrylics processing silicone prosthetics, strong and lightweight material, not as strong and stiff as composites carbon fibre, it is less brittle and is cheaper.
Laminating composite Health and safety: Irritates the eyes, skin and respiratory system, the Catalyst is organic peroxide. Respirators: disposable (£20) and reusable around (£30) which require replacement filters. They have different colours: 6001- organic vapor filter against polyester resin and other vapors. Buy vinyl or nitrile gloves and avoid latex because you can develop an allergy, the polyester will swell the latex. Eye protection must be worn (goggles which enclose the eyes) and Protective clothing.
-Fine surface tissue, vale and woven matting is roving
-Fibreglass tape and fibreglass rope (strengthens the mould, good to use)
-Gel coat resin, smooth hard polyester for capturing surface detail- records the surface of the mould. When it is backed up with fiberglass it is very strong
-Lay-up resin, undergoes polymerisation during curing Fine surface tissue, Catalyst .. Methyl ethyl ketone peroxide (mekp)
Figure 1: 3M. (2014). [online image]. Available from:http://multimedia.3m.com/mws/media/565214O/3m-adflo-cartridge-filter-guide.pdf [Accessed 29 December 2014]

FIBREGLASS GENERIC FACE


Figure 2, 3 and 4: 3M. (2014). [online image]. Available from:http://multimedia.3m.com/mws/media/565214O/3m-adflo-cartridge-filter-guide.pdf [Accessed 29 December 2014]
6001 [BLACK] Suitable for use with polyester resin and other vapors
THE PROCESS
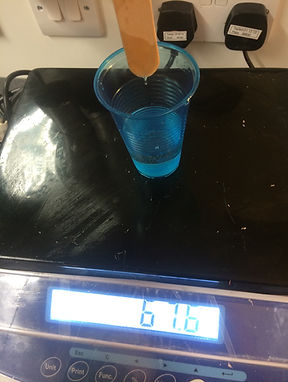
Layup resin: around 2 pounds to kilo. Ratio of catalyst to resin is 2% polyester resin
Gel coat: ratio is 2% catalyst. Has a colour indicator
Mekp: organic peroxide, very dangerous
Choppies are loose strands of fine glass. Chop strand matte is longer glass strands bound together with starch
Fine surface tissue- vail
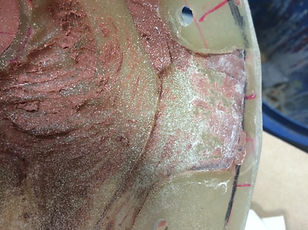
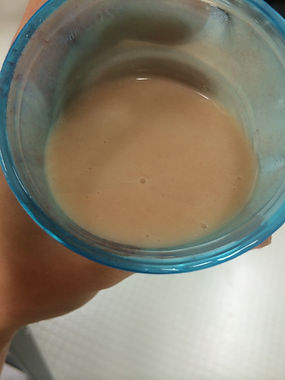
Talc the sculpt to help the gel coat stick to the surface and check over the detailing of the sculpt, then paint the core with a fine layer of paste wax (mould release) and mix the gel coat with 2% catalyst (I mixed 100g of the gel coat with 2g catalyst) This layer is designed to pick up any surface detail. Once the gel coat has fully changed colour it can be smoothed over the surface of the sculpt, checking there are no air bubbles in the material and there is an even coat all over, reaching the outsides of the flashing. (The drying time is usually around twenty minutes to half an hour) it needs to be firm but tacky in texture.
Tindall, P. (2014). BA Hons Make-up for Media and Performance. Arts University Bournemouth. 12 December.
Lay up resin is mixed with 2% catalyst, creating a mud like filler by pouring it half into another cup and mixing it with natural talc. (Mixing it with choppies would be known as porridge, essentially the same thing) this is used if there are any undercuts in the sculpt. Then chop strand matting is added in two layers by pressing the lay up resin firmly over each section, ensuring it has moulded to the shape of the sculpt, avoiding any air pockets between layers which could potentilly damage the cast in the demoulding process.
(I mixed 150g of lay up resin with 3g of catalyst), I Applied the first layer of lay up resin over the sculpt and chased out any air bubbles with a cheap paintbrush dipped in resin, then I thuroughly applied a second layer and repeated the coating process. The last layer of fine surface tissue soaked up excess resin and I was left with a smooth texture due to the glass strands being finer and smaller.
 |
|---|
 |
 |
 |
 |
 |
 |
 |
 |


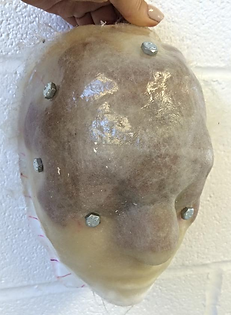
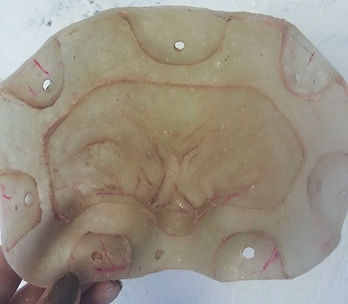
DRILL HOLES
Before de-moulding I held the face up towards the light to determine where the touchdowns where around the sculpt, though they were already visible before doing this, I wanted to see the outline clearly. If the touchdowns are not visible then a torch can be used behind the fibreglass to depict the flashing. I used a 6mm drill bit and matched seven 6mm width screws to fit the holes perfectly, ensuring there would be no movement between the core and mould during the injection process.

FOR ACCURACY
-Get the drill bit as close to 90 degrees as you can, moving the core when necessary
-Drill slowly to start with, this creates a dent in the fibreglass and will enable you to work with a steady base
-Keep drilling through as you remove the drill (this will clean up any edges)
-Secure a bolt before drilling another hole to ensure the fibreglass move in position on the core.


SCREW DRIVER KNOWLEDGE
-Makita 18 volt screw driver is suitable for prosthetics
-Applying more pressure to the button will force the drill bit to spin faster.
-There are two buttons either side of the screwdriver- One will spin clockwise (tightening the drill bit) and the other will spin anti clockwise (loosening the drill bit)
-Setting the drill in between 10 to 12 torque is accurate for prosthetic work
-The frontal three jaw will adjust by holding the chuck front, hold this to tighten the drill bit in place
-Industry standard bolts are 6mm and wing nuts are easier to tighten.

RESOLVING PROBLEMS
I used the vibrosaw to cut through the fibreglass roughly around the flashing and used an electric sander to round the edges down. However, I hadn’t cut the fibreglass close enough to the flashing and the edges weren’t exposed. Therefore the product wouldn’t be able to escape the mould and there wouldn’t be a blending edge. I had to use coarse sandpaper by hand to file the edges of the fibreglass down further because the electric sander isnt designed to withhold the coarse material and it damages the mechanism.


RESIN KNOWLEDGE
-Epoxy Resin is, by nature, thicker than polyester resin. Too much filler means it cannot be poured easily, particularly in a closed mould.
-Add fibreglass tissue to the expoy resin to reinforse pieces requiring strength and stability. No tension nor shrinkage will be created. However, with a higher viscosity the fibreglass will be more difficult to impregnate. Certain brands are adapted to this and are more fluid.
Caution:
-Only use fibreglass tissue. The mat has a product in it that absorbs humidity which means the resin cannot be properly impregnated and is prevented from curing.


Above and Beolow images: Brooks, N. (2011). Advanced Mouldmaking And Casting . Service Filmsetting Ltd. Stockport: Cheshire.
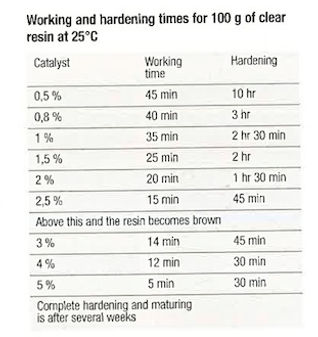
Working Time: Health and Safety
I used two percent catalyst at 2g during the fibreglassing process. The chart below was an indication for how long I had to wait before adding the fibreglass matting (20 minutes) And I left the cast to set for 24 hours before seporating the shell from the core.

Curing:
-The chemical reaction happens as soon as it has been mixed. The polymerisation process takes place in three stages.
-Gelification Period: 30 minutes approximately: Resin and catalyst transforms into a gel.
-Hardening Period: 15 hours at 25 degrees, 20 hours at 20 degrees and 24 hours at 18 degrees
(The room temperature was around 18 degrees and therefore my mould was left for a full 24 hours before I began seporating it)


-Must work in a well ventilated space, the fumes are more concentrated at floor level.
-Wear gloves to protect hands
-If it comes into contact with eyes then wash out immediately- seek out a doctor.
Above images and written notes: Brooks, N. (2011). Advanced Mouldmaking And Casting . Service Filmsetting Ltd. Stockport: Cheshire.
CLEANING AND INJECTING

Cleaning Fibreglass
Liquid wax is often used in industry, quick and effective for cleaning out the mould, a company called (4D models) sell the product. However, in this instance I used mould release wax and a cut the bristles down on a cheap brush to scrub out the residue clay.
The sculpt had a lot of in depth detailing and took a long time to clean and I used sculpting tools to remove the clay in the difficult areas, central to the piece.

Cleaning Fibreglass
The mould release wax worked well with cleaning the negative and picked up most of the clay which was left over on the surface. However, the wax left the surface greasy and had to be washed out with soap and water afterwards.
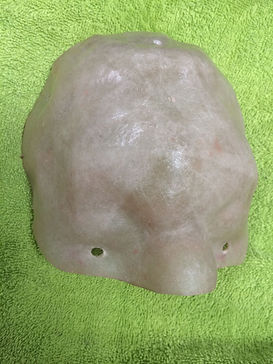
Checking Measurements
After cleaning the mould I layed it on top of the generic face, checking the fit incase the fibreglass had been damaged during the sanding process.
The highest part of the sculpt was central to the eyebrows and this is the area I will be injecting with silicone. I have purchased two 100ml syringes to avoid having to re-fill a smaller syringe with silicone which could be a slightly different shade in colour
and potentially damage the aesthetic of the prosthetic. I also purchased a stainless steel- pump fine mist sprayer to spray on the cap plastic evenly, reaching all necessary areas of both the core and the negative mould.
Injecting Silicone
A 100ml syringe was purchased to fill the mould accurately, without having to re-fill a smaller syringe and creating potential air bubbles on the prosthetics surface. The syringe nozzle measured to a 6.0mm drill bit and I tested the fit once the hole had been drilled into the deepest part of the sculpt- on the core. I used a catering oil spray bottle to lay on fine layers of cap plastic/ alcohol mix onto both the core and the mould. However, I wasn't satisfied with the mist consistency and had to brush over the surface with a paintbrush after spraying the surface.


- Put the nuts and bolts in every hole so that the core and the mould is in correct alignment, A nut spinner can be used to tighten the bolts quicker.
- Leave the nuts and bolts loose so that the silicone can reach the flange, tighten them once the silicone has been injected.

Measure out and mix up the silicone, then pour it into the syringe, keeping the injection hole covered to avoid any wastage. I used 45g of equal parts A and B silicone and 75% softener and 67.6g for the mix, I wanted the piece to be able to crease naturally against the models forehead and move collaboratively with the underlying muscles. Therefore, 75% softener wouldnt be too harsh or soft, and would sit naturally against the models forehead. After, Push any air through the syringe by tilting it upright and releasing a small amount of silicone before injecting.


Blendable Edges:
Push the nozzle of the syringe into the back of the injection hole and begin filling the mould. Silicone should begin to pour out of the sides of the mould and once it has completely filled the bolts can be tightened to avoid any thick edges around the prosthetic.