MIRROR IMAGE
ONES ALTER EGO OR HIGHER SELF
MOULDING THE PROSTHETIC SCULPTURES
THE CORE, ACCESSORY FEATURES AND COVERING THE MAGNETS


Gorton, N. (n/a). Creating character prosthetics in silicone: Part 3. [DVD] Neill Gorton Prosthetic Studios.
-Get your bolt holes 20mm away from your sculpt the whole way around, you want an even pressure the whole way around your sculpt so that there is no gaps in between the edge and the seamline.
-Talk is dusted over the sculpt after the wax and lacquer, this gives the gel coat a surface to adhere to. The fine glass matte is applied first over detailed areas to prevent any air bubbles from forming on the surface of the mould. The fibreglass strand matting is thicker and will not fold into the detailed areas as easily.
-You should always drill your holes before you pop the mould apart for accuracy in your seam line, if you wait until after the mould will never line up as accurately.
-Putting all of the plaster line and wax into a cup will allow you to see how much silicone you need.
-When you aren’t doing anything with your mould make sure you keep it bolted together at all times.
-A hole is drilled at the top of the head to attach the tube from the inside (aluminium) and then a larger tube is used around that and attached with car body filler. Car body filler is also used at the base o the neck to keep the larger tube in place.
-Cheap latex free sponges are used to stipple A and B all over the mould and the core, once a layer has been stippled, take a clean sponge and remove any excess silicone, you want a thin matte layer.


Gorton, N. (n/a). Creating character prosthetics in silicone: Part 3. [DVD] Neill Gorton Prosthetic Studios.
-Netting is used to protect the piece when stretching it. Over the top of the head you do not want the appliance to stretch, apply tough netting from the top and radiating down, this will allow the appliance to stretch horizontally but not vertically. Use the white net in this area, three- five overlapping strips.
-Stipple just over the flange a little, this will give you a cutting edge to trim the seamlinde. Pash airbrush machine is bulletproof and will allow silicone to spray through. The reason the whole thing is not airbrushed is because it takes a lot longer and is dangerous.


-Attach the mould together very slowly. You do not want to scratch the surface of the silicone because you will have to start again. Dip the bolts in vaseline before you drill them in so that they do not snag anything.
Gorton, N. (n/a). Creating character prosthetics in silicone: Part 3. [DVD] Neill Gorton Prosthetic Studios.
Gorton, N. (n/a). Creating character prosthetics in silicone: Part 3. [DVD] Neill Gorton Prosthetic Studios.
 |
|---|
 |
 |
 |
 |
 |
 |
 |
 |
 |
 |
 |
 |
 |
 |
 |
 |
THE CORE
FIBREGLASSING THE BACK
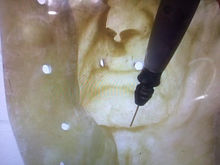
After fibreglassing the core for the first time and making some amateur mistakes with the wall thickness and general structure, I was more confident in the process and felt as though my technique was leading towards a more professional standard. I built the clay wall and used a flat ended sculpting tool to push it against the surface of the sculpt, a disposable brush and water were used to smooth and clean the excess wed clay from the monster clay and the surface was dried with paper towels before applying the gel coat.
I sprayed the sculpt with MACWAX and the clay wall with clear lacquer, both in a ventilated area and a mask was worn at all times to avoid inhaling any of the chemicals. Once I was happy with the thickness of the gel coat and I had covered the whole surface area of the sculpt and wall, I mixed some talk in with a second layer of gel coat and applied this in the sections that I felt could create air bubbles in the fibreglass (the deeper, receding areas of the sculpture).


PROBLEMS WITH THE GEL COAT:
There are a number of reasons as to why the gel coat lifted in a few areas, see images above: I could have overworked the material, not enough drying time, it could have overheated or the room temperature could have been too hot/ humid. I am unsure why this happened, however, this wasn't a problem and it meant I would have to use a small amount of car body filler to smooth out those areas inside the fibreglass negative after demoulding.
FIBREGLASSING THE FRONT
 |
|---|
 |
 |
 |
 |
 |
 |
 |
MACWAX was used again to cover the front of the sculpt and instead of using clear lacquer on the wall, I smoothed petroleum over the surface after cleaning away the wed clay. The same process was repeated as explained above and on both the back and the front I applied four layers of fibreglass matting around the wall for stability. Whilst the fibreglass was still warm I used a sharp cutting knife to trim away the excess and sanding paper to smooth the sharp strands before handling the mould.
THE ACCESSORY FEATURES
PREPARING AND FIBREGLASSING

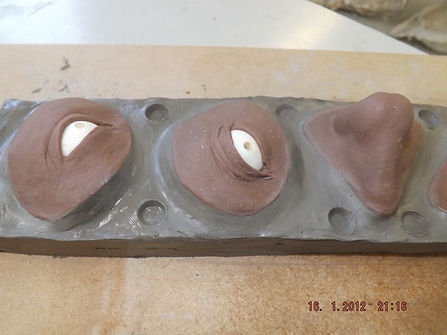


I used clay cutters and chose a desired thickness to slice through the wed clay, this would act as a base for the features to sit comfortably on. I didn't want the sides or backs of the features to be apart of the front fibreglass section and pushed wed clay against the surface. The back of a sculpting tool was used to create the keys, the mould is a squish mould, however, didn't necessarily need many keys as I would still be drilling bolt holes and bolting the two halves together.
 |
|---|
 |
 |
 |
 |
 |
 |
 |
 |
 |
The fibreglass process was relatively simple for the feature moulds, the same technique applied as explained above. However, the talc layer was used to diminish any deep curvatures in the clay and generally smooth the surface to avoid the fibreglass lifting in areas. After researching the fibreglass process more I understood that the fine matting which is usually applied at the final stage was useful for picking up detail and reaching areas that the mormal glass matting would not. Therefore, I applied a layer of the fine glass matting sheets over each feature before applying the larger stand matting and used white pigment to colour the mould.
I felt as though white pigment would be useful during the colouring stage of the process as I would be intrinsic colouring the moulds and the colour would contrast against the flesh tones inside of the mould. I was extremely pleased with my progress with fibreglassing and felt overwhelmed when the moulds came out as I'd hoped. The clear lacquer was one of the most useful sealants I have bought to date and I will continue to use the product in my third year of study. The cleaning process was sped up due to using the product and I spent little time removing the excess clay from the receding nostril holes and from around the sides of each sculpt after peeling it away.


 |
|---|
 |
 |
 |
 |
ENCASING THE MAGNETS
COLLABORATING, NEW PROGRAMMES


RESULT


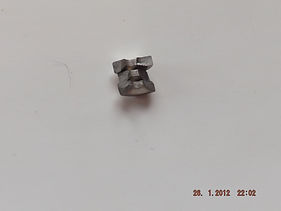
I purchased 50 strong round ring magnets (N50 Rare Earth Neodymium) at 10mm by 3mm to connect the facial features to the core prosthetic. They would be inside of the silicone features and tested both on the front and back of the core mould. I would test the connection by firstly placing them on the inside of the core prosthetic and securing them in place with lace and silicone. If the connection wasn't strong enough to adhere them to the features then I would consider bringing the magnets forward and having them exposed on the front of the prosthetic. The magnets were extremely strong and brittle, therefore, I lost many of them due to them snapping in half. I needed to design a casing to protect them and I wanted the case to have small holes either side, this would allow silicone to flow in and around the magnets, securing them in position.


Initially, I attempted to create a mould by building a very small clay wall out of wed clay and spraying it with clear lacquer. The general shape would be a round centre where the msgnet would lie and two smaller rounded sections either side which I would drill tiny holes into- acting as small tunnels for the silicone to run through. However, this technique didnt work, I used PS CompositeqComposites - fast cast resin to fill the tiny mould and the result wasnt what I initially expected. The positive looked messy and the shape was inaccurate, therefore, I had to think about a different way of moulding to encase the magnets to a professional level.
 |
|---|
 |
 |
 |
 |
 |
 |
 |
 |
The only way of creating the cases small enough was to use a 3D printer and I asked for advice from a student studying architecture design- James Hall. I sketched out the basic design of the cases and he showed me how to use the tools I would need in Rhino 3D and once I had confirmed the design in a 3D format they were sent to Cura which was connected to a 3D printer found in the architecture room at the University.
The moulds turned out better than I expected and the shape was suited for the purpose of encasing the magnet, protecting it and allowing silicone to pass through either side. However, the model was too big as I needed it as thin as possible, I didn't want too much material in front or behind the magnet because it would begin to loose its connection. I resized the model in Rhino and printed out the finalized product again in a clear acrylic. The result was perfect and I used a clear resin to seal the magnet in place, see images above.